Friday, August 4, 2017

OPI, The Show Must Go On! ~discontinued

It's always something...I haven't been able to post due to laptop troubles.
I'm starting off here with the fact that I have been resistant to change. I'm still on an almost 10 year old laptop that runs Windows Vista and still use a flip phone. It took me years to use Facebook, and I opened an Instagram account that I mainly use to follow people. (It took me a hot minute to figure out that I cannot post a comment to IG from my laptop).

Rather than get better acquainted with my Samsung Galaxy Notepad, (or get a smartphone), I spent almost 3 weeks trying to repair my laptop. I've been in a battle with damage from AVG antivirus, that I won't spend any more time on other than to say -that program has sure acted like a virus to my laptop.

 Here's OPI, The Show Must Go On! from the Winter 2010 Burlesque Collection.

  It took 3 coats for even coverage...not sure if it's the formula or the jacked brush that I've been meaning to swap out. (It's extremely flat and floppy and has a tendency to splay out and split on the nail.)


I'm partial to metallics and shimmers and TSMGO is right up my alley. It's a really pretty rose-red with subtle or fleeting red, gold and purplepink shift in some lighting.  Mostly it looks like a cool toned rose-red, that flashes hot molten red with gold sparks. Looking at it brushed on a make-up sponge and through a jewelry loop, it's actually a rose red crelly base with goldish, iridescent flakes.

Tuesday, June 27, 2017

Bow, Nothern Lights...moving to a coffin nail shape

Gorgeous polish, though not the best choice to show an emerging coffin shape.
This isn't something I could have done without an enhancement, as my free edges start to go flat and twist or flare up or down at the smile line. Crooked fingers, uneven finger pads...It's always a struggle with overcompensating when I file. So, I'm going slow...narrowing the sides in steps as my nails grow longer, keeping my eye on my hand as a whole rather than individual fingers.
 Bow polish purchased at Beautometry

Friday, June 9, 2017

Multi chromes...am I missing anything?

I love multi chromes. I've been in buying mode these past 3 months, and seeing many indie companies making them.
I've been out of the loop, and am wondering - are they better than Sally Hansen Nail Prisms?
Here's a shot of Sally Hansen #16, Turquoise Opal on a nail tip, 2 thin coats over black, no top coat. This is an old school polish...it flows over black like melted butter- almost painting itself. No weird angles here...the chromatic display is stunning.


Thursday, June 8, 2017

Brightech - LightView PRO (with magnifying lens)

I ordered this Brightech- LightView Pro in black from Amazon, and was supposed to receive it 2 weeks ago. Unfortunately, something went wrong on Amazon's end, and they cancelled it the day after it was supposed to be here. I researched other mag/lights, but came back to this one for the 4.9 star reviews. I also went with white this time, and got it yesterday. Since my table is too thick to use the BrightView's screw clamp, I ordered a flat base, direct mount bracket, so I can screw it down to my table.

I thought I might have trouble getting used to looking through the lens, but I didn't. I removed my acry gels and reapplied with no problem. I could see so well, I had no skipped spaces due to the ridges on my nails...and was able to get the product right up to my cuticles. This acry gel application is almost flawless.


 Pic below is how it looks on my table. For those of you that remember my nail polish wall shelves- they are still there. I'm currently doing genealogical research and attached a very large cork-board to it with hinges. All I have to do to view and get to my polishes, is swing it out (like a door).
 (Next pic is through the lens...I really love the "framing" here...wished I had thought to center it better.)

Saturday, June 3, 2017

Simple mani...tested Unt peel off base

Target's brand, Defy & Inspire, Purple People Eater over my acry gel enhancement and Unt peel off. China Glaze DV8 on pinky.
Pueen stamping polishes in Rocking Metallic- Cool Aqua and Twilight Magenta. Plates; CICI & SSI 02, Uber Chic 16-03, Chez Delaney D14 and CJS-14.
Mani was a test of Unt peel off. Stamping done on day 2.

Unt peel off....My boss likes to keep our change drawer full to the brim with coin. Instead of sliding coin out, I have to pick it out....lots of trauma to my nail tips. In addition to having to cashier, I also expedite food, which means my hands are under heat lamps with high temps, and the tips of my nails touch hot plates. I also garden, and while I do wear gloves, sometimes I use my hand to dig a hole rather than a tool.

I thought this mani would peel off at the tips, but it didn't. The above shot is after day2 at work and gardening. My corners get the most wear, and I really thought this is where using Unt peel off would give me trouble. I think I could have worn this another day.

My acry gel enhancement is still new to me. My current routine is to do an acetone soak every other week and re-aply. I'd like to extend it to 3 weeks, however, by week 2 my tips feel weirdly flimsy. I don't always paint my nails, and giving out coin at work chips the 2 layers of gel top coat on my tips.  I'm thinking that it's due to the acry gel being exposed to water and a possible mani and non acetone remover.

Now that I know Unt peel off works, the next time I decide to go colorless, I'll use Unt and a clear top coat.


Friday, May 26, 2017

Original Spectraflair franken

I made this 6 years ago with original Spectraflair. I don't recall what base polish I used...from the sweet smell, probably an old school, it may be a Nicka A. Really sheer blush with a soft gold flash. This is 3 thin coats over my acry gel enhancement. Aside from my gel topcoat pooling around some of my cuticles, I think this looks lovely on my nails.


I'll have to wait a few days for some nail growth to file down the pooling and apply another layer of gel top coat. I'm unsure as to why this is happening. I'm using thin layers, and it *looks good until I remove my hands from the UV light.
*Could just be my eyes...I'm expecting a Brightech Lightview Pro magnifier with led lights any day.


Wednesday, May 24, 2017

New project- organizer for round 7mm Chez Delaney plates- picture heavy

I have 128, round 7mm Chez Delaney plates that I want to organize in a folder type holder. Thus far, I have found one place that sells 7mm plate holders- here on Aliexpress. They are side loaders. I almost pulled the trigger on purchasing, but decided to make my own because I think top loaders would be better.
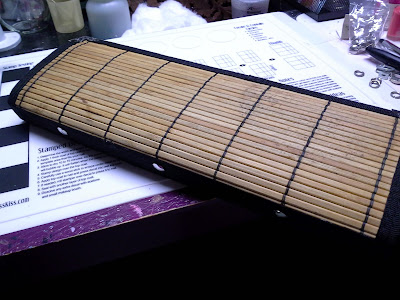
Finished plate holder;

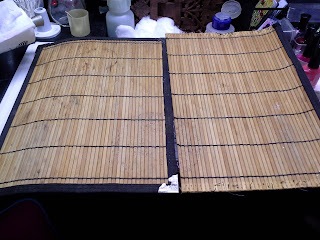
My initial idea was to use upholstery to cover my plates, but switched to re-purposing an old bamboo placemat.
Supplies; 6 pocket picture protectors (leftovers from organizing my husband's family photos...purchased here), 1/2" screw posts from Hobby Lobby (in the leather section...they also carry 1/4" screw posts- great for repairing your existing folders!), sewing machine (you could hand sew), spring steel lacing bones (from my corsetmaking stash...can be purchased here...plastic washers would be a good substitute), polyester thread (is best), choice of cover, awl, leather hole puncher, glue (E6000), drill.


Tips:( I sewed my pockets 7mm.) Use the finest needle you can. Loosen both the needle and bobbin tension. Use the largest stitch on your machine. You want to keep the stitch holes small and spaced  far enough away from eachother with enough "give" to allow reaching into the pocket to remove a plate without it ripping like perforated plastic.

Moving on...The wide channel between the picture pockets will be the fold line...where the screw posts will be installed. Each page of the finished folder will have 6 plates, back to back...vertical.
The lacing bone will be running down the center channel between pockets. The screw post fits perfect through the holes...I used 3.  Assembly goes like this-bone (or washers), upholstery, photo pages, bone...all held by 3 screw posts.) The lacing bone will add stability in addition to keeping the pages from ripping away from the screw posts.
 It was at the above point when I realized that I didn't need a cover at all, and maybe using the upholstery I had in mind would be time consuming. It's embroidered, so I'd have to finish all my edges. Then I saw the placemat.
Shown already cut, binding pirated and re-worked (glued) on the new edge. Bonus- the binding is nylon...the edges can be burned with a lighter to seal. Drilled 3 holes through the placemat for screw posts. Also, I glued that last leftover bit to cover the spine (over the lacing bone) of my holder, and used a red hot awl to burn a hole where the screw post goes.
Above, awl is on the left. On right is a leather hole puncher, and what I used to make holes through the picture sleeves. Below- inside assembly.
Below are metal, decorative corners I found while shopping for the screw posts at Hobby Lobby. 3 sets of 4 in  a burnished finish-silver, brass and copper. I used the silver...Although a bit expensive, I think they add a finished look to my new holder.

Below is a pic with the embroidered upholstery I almost used.


Saturday, May 20, 2017

50% off almost everything at Winstonia

Winstonia
I ordered the 3rd generation plates and some replacement stamper heads...50% off!

Saturday, May 13, 2017

Homemade lint roller stand

Leftover from a bathroom remodel- hand-towel bar. Telling sign that I did not fully inspect this thing before working on my plans for it...there are teeth marks from the pliers I used. I initially thought that the end cap on this bar came off. I didn't see the little screw at the other end (the whole bar comes out of the base)...when I did see it, I unscrewed it with a non magnetic screwdriver, and lost it. Fortunately, I found another that fits, although long. Anyway, I cut out the plastic handle from the lint roller and inserted a new sleeve made from 2 plastic bottles- one slightly smaller than the other, bottoms cut off.  I cut these bottles with a hacksaw, but f I had my Dremel set up, I would have taken more off from the bottom instead of cutting extra from the tops. The higher up you go on the bottles, the flimsy-er they get. Using the hacksaw was a crude way of getting what I wanted...sliding the 2 bottles into each-other, total length, end to end, accommodating the length of the bar.
The base of the towel holder now re-purposed lint roller stand is mounted directly onto my mani table. (I built that myself and can make all the messes (as you can see), that I want.)
I think it turned out well enough- it does exactly what I want it to do.
CICI & SISI sell a beautiful acrylic lint roller stand that you can purchase here . I don't know if other lint rollers than their own would fit their stand.


Monday, May 8, 2017

Going through the stash

Fusion from Avon...purchased years ago, when mannequin hands were the rage. The swatch in the catalog looked flesh colored, but it arrived mauve.
I thought this polish would go in my frankening box, but I really like it. Fusion leans more on the neutral side, not as cool, mauve-y as I first thought. It has a beautiful pearl finish, which I also like. I'm not crazy about the pink glitter...it's as if the makers were trying to make it "edgy". Doing an image search, seems Avon reformulated Fusion and added more glitter in 2008, making it a grainy mess.
This polish makes my boxy, mannish hands seem more delicate and feminine- just- really flattering.


Saturday, May 6, 2017

More tinkering with holders, also Bliss Kiss, CiCi and SiSi

I don't know if I ever put this out here...back in1982, I had a factory injury which involved A 1" steel rod going through my right (dominant) hand in addition to it being crushed between 2 steel plates...the force, 7,500 lbs of hydraulic pressure. Were it not for a very fine surgeon, I would have lost my hand. I have limited range of motion, so the way stamper holders feel and perform in my hand is important. Conical holders...not a good idea. They either slip out of my hand or my grip is wonky.
Anyway...I received 3 new stampers yesterday...Bundle Monster XL (conical holder), Bliss Kiss clear and CiCi and SiSi clear (conical glass holder).
 Love the Bliss Kiss holder. I made a similar holder (orange) last week using a hairspray cap and inserting a cut-down prescription bottle so the head won't move. I also hot-glued in a bushing to my Wistonia holder to keep a head in place. The Bundle Monster holder also got a much needed make-over....I hot-glued that into another cap and added a metal filigree napkin ring. Love the flat head on this one.
CiCi and SiSi holder...so elegant looking, but a no go for me...too heavy. Love the clear conical head on this one. I'll be looking for an alternate holder. Top row, L to R; new and improved Wistonia holder, Bundle Monster holder, Diy. Bottom row L to R; Bliss Kiss, CiCi and SiSi, Diy

Speaking of CiCi and SiSi...Last month I purchased 6 sets of their metal plates from DestashTheDupes on Storenvy. Curious about their acrylic plates, I went ahead and ordered 3 from their site....LOVE them so much, I ordered 7 more direct, and 4 more from DestashTheDupes.

Here's a pic of what my bum hand looks like;


Thursday, May 4, 2017

My favorite topper, Pure Ice, Oh Baby!

Pure Ice, Oh Baby!...discontinued?! Imo, the best thing Bari Cosmetics ever made. Oh Baby!, I love you so much....build-able, irregular micro flakes that shift from turquoise to blue to purple to pink. To my eye, this stuff always made everything look better on my wide, Chicklet nails. Here it is, just one coat, over Color Club, Tangerine Scream.


Saturday, April 29, 2017

Desire so strong you had to have it yesterday...Franken- Greyvid Copperfield by Lacquester

 Seen on Instagram, maria_bloodrednails
*EDIT* Can be purchased here http://www.lacquester.com/shop/greyvid-copperfield/
 Perhaps these are different batches or a revamp, or photographer skills...they do not look like the same polish. I LOVE the instagram version, so I frankened one up.
I used- Sally Hansen Extreme Wear in Grey Area #330, Kleancolor Chunky Copper and Wet n Wild Clear.
I really shouldn't post minutes before I leave for work. I made an error on where to purchase Greyvid Copperfield....fixed now. Seems it's out of stock. I WILL be purchasing the original when it becomes available. In the mean time, I'll enjoy my franken.


Friday, April 28, 2017

Stamping w/plate TU-L030

Vertical sponging over the no name Orly DADA with an old Sally Hansen Fire Opal (in Flame Opal) to add more red flash. Double stamped with 2 greens from Handy Sexy Metals collection, using  plate TU-L030, purchased from Aliexpress. Other colors applied with dotting tool...Handy white, turquoise and Essie Mint Candy Apple.


Thursday, April 27, 2017

Orly DADA

Purchased this Orly DADA years ago in some hole-in-the-wall beauty store in Philadelphia. Purple jelly and warm pink shimmer...love it. No number or name on the bottle.

I think I will stamp over this soon. I have these fimo pieces that remind me of peacock eyes, that I might add. Purchased three wheels of them because I liked them so much, at that same store in Philadelphia.

Saturday, April 22, 2017

Tinkering with stamper holders

 This is what I did to my Wistonia holder. (All the gold pieces to the FCC polish on left are removable. I used the bottom half as a sheath.) While the holder itself works better with my hands, and isn't top heavy anymore, I still spend a lot of time getting the head in just right. This holder needs an inner lip.

 Found this item at work (I'm still managing the same restaurant). I think it came from the 5 gallon cooking oil cartons we order.  My XL stamper heads fit just right...and there's an inner lip, so I cut it down and sanded the edge.

The Clear Jelly head fits as well. I've been having trouble using my CJS due to glare. I actually thought it was my lighting, however, when I look through this holder, I can see my nail perfectly!