Thursday, December 30, 2010

Name my franken contest, no entry limit!

Hi Kids!
I've been saving something special for the last post of 2010 here in Glammed-Up. It's a franken I made last year that came thisclose to being dumped in the trash can.
Although I make a lot of frankens, most don't ever get showcased in this blog. The majority of them are nothing really special...mostly a doctoring up of dupes so they're slightly different and frankening lacquers solely for stamping.

Last year, when I was on a quest to franken RBL Scrangie, I put together the franken I'm bringing you today. It's made of WnW Clear, minerals and/or pigments- no other polish. I was going to dump it out when the pigment used for the base color refused to mix properly even with 3 ballz in the bottle. Having made so many Scrangie fails, I lost interest in making any more and being too lazy to salvage bottle, brush and ballz, I just put this one aside and forgot about it...
Until my daughter, Amber, called me from work one day to to gush about how extraordinarily pretty the polish she was wearing  was and to ask me where it had come from. I was confused until she described it to me...it was my franken! Catching her excitement, I took down the bottle and swatched it on a nail wheel. After months of sitting on the shelf, the base pigment had totally dissolved into the clear, and it was just as pretty as she said it was!

It's unfortunate that I cannot remember how I made this. The 2 ingredients I am 100% sure I used were WnW Clear and Manganese Violet pigment. I have no idea what the tri-chrome sparkles are...something I have from TKB, Aromaleigh, a mix of the 2 or something else. I don't recall seeing this effect when I first made it, so maybe it's in the process of sitting/marinating that aligned these sparkle particles this way, or maybe they *were* there all along but invisible to my eye due to the base color problems.

My un-named franken is a sheer red purple with sparkle flecks that travel from blue to pinkish purple to (camera elusive) turquoise. It would take 5 to 6 coats to reach bottle color, however, since I have only 2/3 of a bottle, I chose to layer my franken over 2 coats of Rimmel Violet Metal.

I am very proud of this franken and love it to pieces. It deserves to have a name...and that's where you come in, Readers. Since I lack the skill it takes to come up with a fitting name, I'm leaving it up to one of you.
Name my Franken Rules;
1.) Open to USA only (sorry)
2.) You must be a Follower (show me how)
3.) It must be clever (as an example this post from Body and Soul. I LOVE the name You Sleigh Me from Forsythe)
4.) Enter as many names as you can think of!!!
The winner will receive; Sally Hansen Hidden Treasure, Opulent Cloud, Mystic Lilac, Purple Gala and a small decant of my franken. (Picture at the end of this post)
Contest ends January 9, 2011

After all that, I guess I should show you my pretty....
Pictures taken randomly- with top coat, without, before clean-up after, and in different light conditions. Shifting colors are so hard to capture, so please excuse the 15 + or - pictures I'm about to post. For some reason, my camera made the blue look super dark and saturated. In rl it is lighter like the second bottle picture. Anyway, since there are so many, I've kept them small and leave it to you to click for the larger versions.


I think I remembered to post everything. If I've forgotten anything, I will add it later.
Good Luck everyone...and HAPPY NEW YEAR!!!

Winnings;
(Small bottle is for reference. It does not contain my franken yet)

Tuesday, December 28, 2010

Freehand flower garden

Hi Kids
It's been a long time since I picked up a brush to paint...2003, I believe...when I redecorated my sewing/craft studio. That said, most of my painting supplies were for painting on furniture and other large surfaces. Since I had the day off on Sunday due to the snow, I trekked over to Michael's for some paint and brushes.

 Geez Louise- things have gone up in price! Instead of leaving with the Liquitex set I planned on getting ($90), I got a Reeves Intro Set for a sweet $11.99, a bunch of brushes and a new clean-up brush.

Anyway, I didn't have as much time to spend on my nails as I thought I would. My dh did not get called into work like he said, so I had to juggle time spent between the 2. My flower garden mani didn't turn out too bad- definitely much nicer to look at than the view of 15+ inches of snow out my window. Considering the time I had and the fact that I've never freehanded on anything this small before, I'm happy with my first attempt.

The following pics taken at night under incandescent light, and not very color accurate. Click to make bigger...


bling;


The following pictures taken this morning under natural light and are more color accurate;


My dh picked the base color for this mani, China Glaze Rio. I used 1 coat of Rio over (my underwear), 2 coats of Avon Ballerina. I'm pretty much mortified at the condition of my hands in all my pics, especially this next one- don't click on it!
Black tips done using guides and 1 coat QingYu black;


Fauxnad plate T27, stamped with QingYu black. The purpose of stamping something here is to create depth...any image would do. I used the bubble image because I love it and needed to practice this problematic (for me) image.


 Reeves Intro Set...18 tubes of color for $11.99!


Nfu-Oh #50 layered over black tips. Yellow rhinestones and iridescent hex glitter (AB crystal and black) also used.
2 coats of Seche...should and will get another before I leave for work.

Friday, December 24, 2010

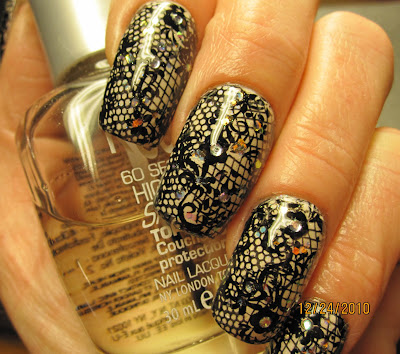
Faux lace, layered fauxnad and Konad

Hi Kids!
It's a good thing I Love this 'nadded mani so much. This year, the restaurant is open on Xmas day and I'll be too busy to even *think* about a different mani.
Anyway, this 'nadded faux lace was inspired by the way cool nail skinz You've Got Nail posted the other day.
Since this is my Xmas mani, I took the inspiration further and added sparkle.

This turned out soooo pretty...please click on the pictures to see them as they should...


Mani is 3 coats Brucci Princess Di
1 coat Love My Nails Dazzling
Konad M57
Fauxnad plates; A05, H16, H41, P21, P48, T33
Essence plates- 2 rectangular (no #s)
9 plates total!
QingYu black for stamping
Crystal AB rhinestones
Hard Candy Break Up applied in random places
2 coats Seche


One more...


Merry Christmas!

Wednesday, December 22, 2010

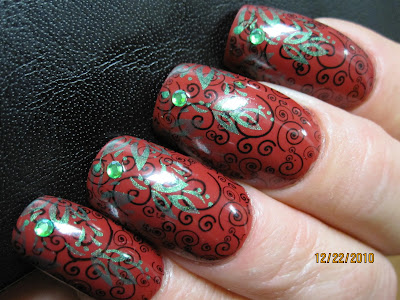
Xmas fauxnad, essie Very Cranberry

Hi Kids!
Aaaaaaaaah... I'm feeling like my old self again...New nails ahead, and they are long!
Anyway!...Would you believe that while I have a fair amount of essie lacquers in my collection, I don't recall ever doing a full mani with one? I've passed them by for 1 reason... fear of application issues due to the puny brush essie is known for. With Very Cranberry on my nails, I found my fear unwarranted. The formula of this one made application a breeze even with the puny brush.

Very Cranberry, a neutral red, would look fabulous on just about every skin tone. I first thought this to be a creme, but it has a soft, very fine, micro shimmer, so I don't know what to call it. This is one of the few reds
that look good on me and that I feel comfortable wearing.
Here it is- 2 coats- and some fauxnad


Products used; Fauxnad plates H29, H25 & H14 stamped with a green franken and Qing Yu black, iridescent green stones and 2 coats Seche.

I really like this understated Christmas mani, though I'm not sure how long it will last...already I'm obsessed with touching the stones...only a matter of time before "picking mode" gets triggered...
Next 2 pics Very Cranberry alone. You may have to enlarge these to see the shimmer...


Monday, December 20, 2010

Red flakies and multi colored micro glitter on black

Hiya Kids!
A couple of days ago, I had to remove my acrylics due to lifting. Unfortunately, I had to go through the weekend, which included my 49th birthday yesterday, with nubbins. With no free edge, my nails are nubby nubbins.
Anyway, this layered flakie, glitter mani had just the right amount of oomph to get me through the weekend.
I love how Love My Nails Dazzling turned into a rainbow of multi colored sparkle on my nails. Please click on pics...


 Products I used:
Nutra Nail Bulletproof Strength (My dd loves this one. It has Kevlar fibers in the formula)
Instant Artificials
Color Club Where's The Soiree?
Franken- red jelly with red flakies and red hex glitter
Love My Nails Dazzling
2 coats Seche


Friday, December 17, 2010

Butterflies, glitter and fauxnad flowers

Hi Kids!
Expecting me to jazz up yesterday's mani, Avon Glisten Scintillant with snowflakes?...NOT!
We got our first snow here in Southern New Jersey, so the last thing I wanted to wear on my nails was a winter theme.
'Tis the season for my whining and complaining about the cold. I hate winter. All those warm and fuzzy TV commercials with everyone gathered around the fireplace sipping hot chocolate and toddies does nothing for me. It's a sham...it's freaking COLD outside, and no kind of household heat can rid me of the radiant cold I feel creeping through the floorboards and through windows.
My husband is planning on retiring to the Mid West within 10 years. He will be going alone, I'm afraid. I'm going South, to get as close to the Equator as I can.
Anyway...
Cold, first snow...bad. Butterflies, flowers...good.
Yesterday's mani, Avon Glisten Scintillant topped off with body tattoo glitter butterflies and fauxnad flowers stamped with WnW Nocturnal using Essence plate from Ulta. I also accented the butterfly bodies with small hex glitter in several colors for some extra flash. Sally Hansen Hidden Treasure and Nfu-Oh #50 also used to accent butterfly wings. 2 coats Seche.
I like this...
You'll have to click on these to get a better look at the pretty sparkle.


Out of focus


Here's the body tattoos I used. They're applied using water, just like water nail decals. The only drawback I have found with this type of glitter tattoos is that after they're on the nail, the surface feels sticky. Within a day, this sticky-ness will work its' way up and through topcoats. I'll be adding Barielle Extender to this before I leave for work to see if it helps with this issue.